EDITOR’S BLOG – Choosing Your Travel Luggage Set Up
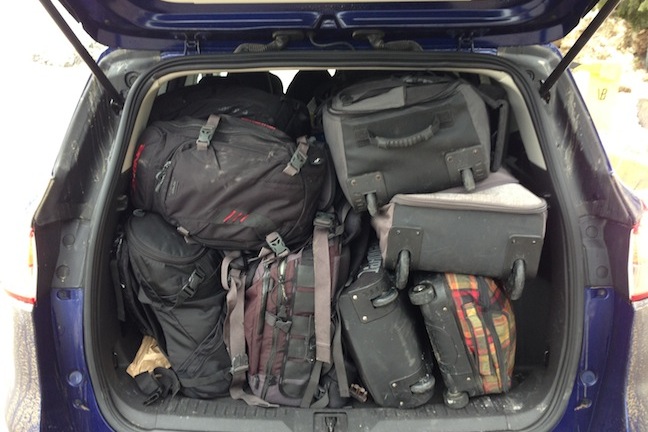
If you can’t tell from the photo, this is the gear of 4 snowboarders, one of whom is a photographer – with full kit, including flashes all jammed into a tiny little Ford Escape. This pack was no easy feat! Image:: Alex Horvath
Mountainwatch | Alex Horvath
If you have ever been on and overseas snow trip, and I assume most of our loyal audience has, then you would definitely understand the importance of functional travel luggage. Right now, I am in the final phase of a three week ski trip that has seen me dragging my luggage through airports, onto buses, down hotel corridors, quietly into hostel dorm rooms, and jamming it in a very tetris-like manner, into a tiny rental SUV! Throughout all of these adventures I have felt quietly smug about the luggage decisions I made on this trip as it has proven to be remarkably pain free.
STEP 1 – The Board/Ski Bag
The first step, is to hunt down and buy the perfect board bag , I chose a reasonably sized bag (that I could borrow for free off a mate) that would be tough, long lasting and able to accommodate a whole lot of gear. Now, I did borrow this bag even though I have my own; as the board bag I have is a ridiculous size that weighs 7.1kg with no gear in it. So that was lesson number 1, when your bag has to weigh under 23 kg, don’t waste 7.1 kg on an empty heap of plastic, nylon and wheels.
The size you decide to purchase will depend on how much gear you like to take, I bring a lot and by the time I have stuffed three boards , skins, avy gear, boots and outerwear, it doesn’t leave much room (or weight) for anything else. If you are a skier who likes to ride big powder planks then you will probably wanna go for a a ski bag that is nice and long – most manufacturers cater to anything up to about 190 cm these days. Keep in mind, your bag will get thrown around by baggage handlers that probably don’t care much for your precious equipment, best to get something padded!
The third and probably most important item that you need on your gear bag is wheels, if you are at the shop umming and aahhing about the value of the $50 cost to upgrade to a bag with wheels, then kick your self and go for the wheels. If you don’t, then you will be kicking yourself even harder for not getting them. Most bags these days come with a wheel system that is made using skateboard wheels and bearings, this makes maintenance really easy, and will mean the bag lasts longer.
STEP 2 – The “Other Stuff” Bag
Now this bag is sometimes a complicated issue, most trips longer then 7 days will require the use of another bag; as it’s quite hard to get all your gear into a board bag and keep it under 23kg. The problem is that you usually have to pay for the privilege of an extra piece of checked baggage, for this trip I decided the $70 fee was worth it. In the past I have used those soft wheelie suit cases that most brands make. This has been good, until you have to jam your bag into a tight space such as a rental car – the wheely part is usually super solid and can’t be compressed.
For this trip I decided to go with a soft, but tough, waterproof duffle bag from a well known outdoor brand. These bags are designed for expeditions in The Himalayas, and are built tough enough to be winched up cliffs and tied onto donkeys. Compressibility and water proofing are the most important features, and the backpack straps over the top make it really easy to carry while lugging all your gear around.
In terms of size, duffles usually come in a variety of 60, 90 or 120L sizes. I went with a 90L and it has proven to be plenty big enough.
STEP 3 – The Carry-On Bag
Last but most definitely not least is the bag you decide to carry on to the plane with you. This is generally where all the important stuff – passports, tickets, cameras, laptops, ipads etc – end up being stashed. I absolutely hate the idea of a wheelie carry on bag, so for me any of those bags that claim to be suitcases small enough to carry-on are out the window.
I decided to use my backcountry back pack as my carry on bag, and this is something that has always worked great for me. My pack is a sturdy 28L size with three main compartments built super-tough. Make sure you choose a pack that is functional and convenient at the same time, but most of all make sure it is comfortable, as you will probably spend a lot of time wearing it. Using your hiking pack means that it takes one item out of your board bag. Usually it will have tons of straps and spots to tie on anything you had to carry on with you, in order to save weight in your other bags. Pretty convenient. Don’t forget a nice stainless, or BPA free, reusable water bottle, staying hydrated is often the key to arriving fresh, just remember to make sure it is empty before going through security.
Most of the above is quite straight forward but hopefully it gives you something to think about next time you pack for that long-awaited overseas shred trip, the right luggage choices will definitely make your time on the road as smooth, and hassle free, as possible.
Heading overseas soon? Need some new luggage? Head to Melbourne Snowboard Centre, Melbourne’s Biggest Online Snow Store